Appearance
用户模块
🪵 布局容器 >

布局容器-组件路由
实现:首页,健康百科,消息通知,我的,布局容器的搭建
- 基础组件
Home/index.vue
vue
<script setup lang="ts"></script>

<template>
  <div class="home-page">home</div>
</template>

<style lang="scss" scoped></style>Article/index.vue
vue
<script setup lang="ts"></script>

<template>
  <div class="article-page">home</div>
</template>

<style lang="scss" scoped></style>Notify/index.vue
vue
<script setup lang="ts"></script>

<template>
  <div class="notify-page">home</div>
</template>

<style lang="scss" scoped></style>User/index.vue
vue
<script setup lang="ts"></script>

<template>
  <div class="user-page">home</div>
</template>

<style lang="scss" scoped></style>- 布局容器
vue
<script setup lang="ts"></script>

<template>
  <div class="layout-page">
    <router-view></router-view>
    layout
  </div>
</template>

<style lang="scss" scoped></style>- 路由配置
ts
routes: [
  { path: '/login', component: () => import('@/views/Login/index.vue') },
  {
    path: '/',
    component: () => import('@/views/Layout/index.vue'),
    redirect: '/home',
    children: [
      { path: '/home', component: () => import('@/views/Home/index.vue') },
      { path: '/article', component: () => import('@/views/Article/index.vue') },
      { path: '/notify', component: () => import('@/views/Notify/index.vue') },
      { path: '/user', component: () => import('@/views/User/index.vue') },
    ],
  },
]布局容器-底部tab栏
实现:底部tab的切换
步骤:
- 使用
tab-bar实现路由切换功能 - 给
tab-bar加上自定义图标
代码:
- 路由切换功能
html
<van-tabbar route>
  <van-tabbar-item to="/home">首页</van-tabbar-item>
  <van-tabbar-item to="/article">健康百科</van-tabbar-item>
  <van-tabbar-item to="/notify">消息中心</van-tabbar-item>
  <van-tabbar-item to="/user">我的</van-tabbar-item>
</van-tabbar>- 自定义图标
vue
<script setup lang="ts"></script>

<template>
  <div class="layout-page">
    <router-view></router-view>
    <van-tabbar route>
      <van-tabbar-item to="/home">
        首页
        <template #icon="{ active }">
          <cp-icon :name="`home-index-${active ? 'active' : 'default'}`" />
        </template>
      </van-tabbar-item>
      <van-tabbar-item to="/article">
        健康百科
        <template #icon="{ active }">
          <cp-icon :name="`home-article-${active ? 'active' : 'default'}`" />
        </template>
      </van-tabbar-item>
      <van-tabbar-item to="/notify">
        消息中心
        <template #icon="{ active }">
          <cp-icon :name="`home-notice-${active ? 'active' : 'default'}`" />
        </template>
      </van-tabbar-item>
      <van-tabbar-item to="/user">
        我的
        <template #icon="{ active }">
          <cp-icon :name="`home-mine-${active ? 'active' : 'default'}`" />
        </template>
      </van-tabbar-item>
    </van-tabbar>
  </div>
</template>

<style lang="scss" scoped>
.layout-page {
  :deep() {
    .van-tabbar-item {
      &__icon {
        font-size: 21px;
      }
      &__text {
        font-size: 11px;
      }
      &:not(.van-tabbar-item--active) {
        color: var(--cp-text3);
      }
    }
  }
}
</style>布局容器-访问权限控制
实现:需要登录的页面,需要判断是否有
token
vue-router 导航守卫文档
return '/login'跳转指定地址- 不返回,或者
return true就是放行 - 可以不是
next函数了
访问权限控制
router/index.ts
ts
// 访问权限控制
router.beforeEach(to => {
  // 用户仓库
  const store = useUserStore()
  // 不需要登录的页面,白名单
  const wihteList = ['/login']
  // 如果没有登录且不在白名单内,去登录
  if (!store.user?.token && !wihteList.includes(to.path)) return '/login'
  // 否则不做任何处理
})提问:
- 如果
/register也不需要登录,写哪里?const wihteList = ['/login', 'register']
布局容器-页面标题
实现:切换页面切换标题,扩展
vue-router的类型
- 给每一个路由添加 元信息 数据
router/index.ts
ts
const router = createRouter({
  history: createWebHistory(import.meta.env.BASE_URL),
  routes: [
    { path: '/login', component: () => import('@/views/Login/index.vue'), meta: { title: '登录' } },
    {
      path: '/',
      component: () => import('@/views/Layout/index.vue'),
      redirect: '/home',
      children: [
        {
          path: '/home',
          component: () => import('@/views/Home/index.vue'),
          meta: { title: '首页' },
        },
        {
          path: '/article',
          component: () => import('@/views/Article/index.vue'),
          meta: { title: '健康百科' },
        },
        {
          path: '/notify',
          component: () => import('@/views/Notify/index.vue'),
          meta: { title: '消息通知' },
        },
        {
          path: '/user',
          component: () => import('@/views/User/index.vue'),
          meta: { title: '个人中心' },
        },
      ],
    },
  ],
})- 切换路由设置标题
router/index.ts
ts
router.afterEach(to => {
  document.title = `${to.meta.title || ''}-优医问诊`
})- 扩展元信息类型
types/vue-router.d.ts
ts
import 'vue-router'

declare module 'vue-router' {
  // 扩展 元信息类型
  interface RouteMeta {
    // 标题
    title?: string
  }
}温馨提示
建议修改标题放 后置守卫 ,切换路由完成后修改标题
布局容器-加载进度
实现加载进度显示
- 由于都是懒加载的组件,在切换路由的时候需要加载资源,网速不好会 “静止”
- 需要等加载完路由对应组件资源,才会渲染页面结构,为了提高用户体验,加上进度条
使用步骤:
- 安装插件
bash
pnpm add nprogress
pnpm add @types/nprogress -Dts
import NProgress from 'nprogress'
import 'nprogress/nprogress.css'- 切换路由前开启
diff
router.beforeEach((to) => {
+ NProgress.start()- 路由切换完毕后关闭
ts
router.afterEach(to => {
  // 修改标题
  document.title = `${to.meta.title || ''}-优医问诊`
  NProgress.done()
})- 插件配置,颜色修改
ts
NProgress.configure({
  showSpinner: false,
})main.scss
scss
#nprogress .bar {
  background-color: var(--cp-primary) !important;
}🛖 个人中心 >
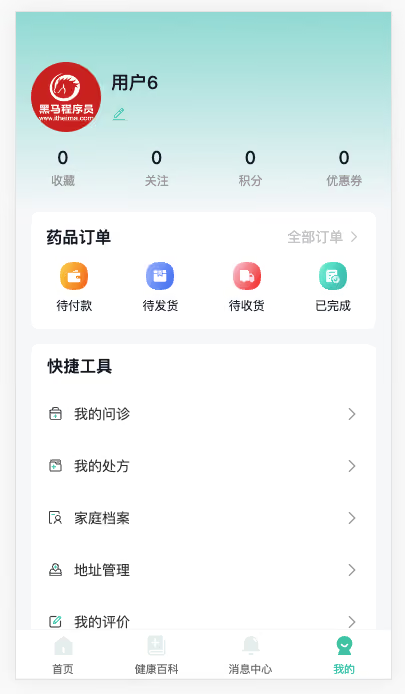
个人中心-用户信息类型
掌握:Pick 与 Omit 从现有类型中得到可复用类型
场景:
- 有
User对象类型,现在需要UserInfo类型,字段多一些 - 使用 交叉类型 可以复用
User类型,但是不需要 token 属性
Pick 与 Omit TS内置类型
- Pick 可以从一个对象类型中 取出某些属性
ts
type Person = {
  name: string
  age: number
}
type PickPerson = Pick<Person, 'age'>
// PickPerson === { age: string }- Omit 可以从一个对象类型中 排出某些属性
ts
type Person = {
  name: string
  age: number
}
type OmitPerson = Omit<Person, 'age'>
// OmitPerson === { name: string }落地代码:
ts
// 用户信息
export type User = {
  token: string
  id: string
  account: string
  mobile: string
  avatar: string
}

// 短信验证码类型
export type CodeType = 'login' | 'register' | 'changeMobile' | 'forgetPassword' | 'bindMobile'

// 个人信息
type OmitUser = Omit<User, 'token'>
export type UserInfo = OmitUser & {
  /** 关注 */
  likeNumber: number
  /** 收藏 */
  collectionNumber: number
  /** 积分 */
  score: number
  /** 优惠券 */
  couponNumber: number
  orderInfo: {
    /** 待付款 */
    paidNumber: number
    /** 待发货 */
    receivedNumber: number
    /** 待收货 */
    shippedNumber: number
    /** 已完成 */
    finishedNumber: number
  }
}小结:
Pick作用?- 从类型对象中取出指定的属性类型
Omit作用?- 从类型对象中排出指定的属性类型,得到剩余的
个人中心-头部展示
实现:头部个人信息展示与订单卡片布局
步骤:
- 熟悉基础结构
- 定义API函数
- 获取数据进行渲染
代码:
1)熟悉基础结构
vue
<script setup lang="ts"></script>

<template>
  <div class="user-page">
    <div class="user-page-head">
      <div class="top">
        <van-image round fit="cover" src="https://yanxuan-item.nosdn.127.net/ef302fbf967ea8f439209bd747738aba.png" />
        <div class="name">
          <p>用户907456</p>
          <p><van-icon name="edit" /></p>
        </div>
      </div>
      <van-row>
        <van-col span="6">
          <p>150</p>
          <p>收藏</p>
        </van-col>
        <van-col span="6">
          <p>23</p>
          <p>关注</p>
        </van-col>
        <van-col span="6">
          <p>270</p>
          <p>积分</p>
        </van-col>
        <van-col span="6">
          <p>3</p>
          <p>优惠券</p>
        </van-col>
      </van-row>
    </div>
    <div class="user-page-order">
      <div class="head">
        <h3>药品订单</h3>
        <router-link to="/order">
          全部订单
          <van-icon name="arrow" />
        </router-link>
      </div>
      <van-row>
        <van-col span="6">
          <cp-icon name="user-paid" />
          <p>待付款</p>
        </van-col>
        <van-col span="6">
          <cp-icon name="user-shipped" />
          <p>待发货</p>
        </van-col>
        <van-col span="6">
          <cp-icon name="user-received" />
          <p>待收货</p>
        </van-col>
        <van-col span="6">
          <cp-icon name="user-finished" />
          <p>已完成</p>
        </van-col>
      </van-row>
    </div>
  </div>
</template>

<style lang="scss" scoped>
.user-page {
  background-color: var(--cp-bg);
  min-height: calc(100vh - 50px);
  padding: 0 15px 65px;
  // 头部
  &-head {
    height: 200px;
    background: linear-gradient(180deg, rgba(44, 181, 165, 0.46), rgba(44, 181, 165, 0));
    margin: 0 -15px;
    padding: 0 15px;
    .top {
      display: flex;
      padding-top: 50px;
      align-items: center;
      .van-image {
        width: 70px;
        height: 70px;
      }
      .name {
        padding-left: 10px;
        p {
          &:first-child {
            font-size: 18px;
            font-weight: 500;
          }
          &:last-child {
            margin-top: 10px;
            color: var(--cp-primary);
            font-size: 16px;
          }
        }
      }
    }
    .van-row {
      margin: 0 -15px;
      padding-top: 15px;
      p {
        text-align: center;
        &:first-child {
          font-size: 18px;
          font-weight: 500;
        }
        &:last-child {
          color: var(--cp-dark);
          font-size: 12px;
          padding-top: 4px;
        }
      }
    }
  }
  // 订单
  &-order {
    background-color: #fff;
    border-radius: 8px;
    margin-bottom: 15px;
    padding-bottom: 15px;
    .head {
      display: flex;
      justify-content: space-between;
      line-height: 50px;
      padding: 0 15px;
      a {
        color: var(--cp-tip);
      }
    }
    .van-col {
      text-align: center;
      .cp-icon {
        font-size: 28px;
      }
      p {
        font-size: 12px;
        padding-top: 4px;
      }
    }
  }
  // 分组
  &-group {
    background-color: #fff;
    border-radius: 8px;
    overflow: hidden;
    h3 {
      padding-left: 16px;
      line-height: 44px;
    }
    .van-cell {
      align-items: center;
    }
    .cp-icon {
      font-size: 17px;
      margin-right: 10px;
    }
  }
  .logout {
    display: block;
    margin: 20px auto;
    width: 100px;
    text-align: center;
    color: var(--cp-price);
  }
}
</style>2)定义API函数
ts
import type { CodeType, User, UserInfo } from '@/types/user'

// ... 省略 ...

// 获取个人信息
export const getUserInfo = () => request<UserInfo>('/patient/myUser')3)获取数据进行渲染
ts
import { getUserInfo } from '@/services/user'
import type { UserInfo } from '@/types/user'
import { onMounted, ref } from 'vue'

const user = ref<UserInfo>()
onMounted(async () => {
  const res = await getUserInfo()
  user.value = res.data
})diff
+<div class="user-page" v-if="user">
    <div class="user-page-head">
      <div class="top">
+        <van-image round fit="cover" :src="user.avatar" />
        <div class="name">
+          <p>{{ user.account }}</p>
          <p><van-icon name="edit" /></p>
        </div>
      </div>
      <van-row>
        <van-col span="6">
+          <p>{{ user.collectionNumber }}</p>
          <p>收藏</p>
        </van-col>
        <van-col span="6">
+          <p>{{ user.likeNumber }}</p>
          <p>关注</p>
        </van-col>
        <van-col span="6">
+          <p>{{ user.score }}</p>
          <p>积分</p>
        </van-col>
        <van-col span="6">
+          <p>{{ user.couponNumber }}</p>
          <p>优惠券</p>
        </van-col>
      </van-row>
    </div>
    <div class="user-page-order">
      <div class="head">
        <h3>药品订单</h3>
        <router-link to="/order">全部订单 <van-icon name="arrow" /></router-link>
      </div>
      <van-row>
        <van-col span="6">
+          <van-badge :content="user.orderInfo.paidNumber || ''">
            <cp-icon name="user-paid" />
+          </van-badge>
          <p>待付款</p>
        </van-col>
        <van-col span="6">
+          <van-badge :content="user.orderInfo.shippedNumber || ''">
            <cp-icon name="user-shipped" />
+          </van-badge>
          <p>待发货</p>
        </van-col>
        <van-col span="6">
+          <van-badge :content="user.orderInfo.receivedNumber || ''">
            <cp-icon name="user-received" />
+          </van-badge>
          <p>待收货</p>
        </van-col>
        <van-col span="6">
+          <van-badge :content="user.orderInfo.finishedNumber || ''">
            <cp-icon name="user-finished" />
+          </van-badge>
          <p>已完成</p>
        </van-col>
      </van-row>
    </div>
</div>个人中心-快捷工具
实现:快捷工具栏目渲染
步骤:
- 准备初始化结构
- 准备初始化数据
- 遍历
代码: 1)准备初始化结构
html
<div class="user-page-group">
  <h3>快捷工具</h3>
  <van-cell title="标题" is-link :border="false">
    <template #icon><cp-icon name="user-tool-01" /></template>
  </van-cell>
  <van-cell title="标题" is-link :border="false">
    <template #icon><cp-icon name="user-tool-01" /></template>
  </van-cell>
</div>2)准备初始化数据
ts
const tools = [
  { label: '我的问诊', path: '/user/consult' },
  { label: '我的处方', path: '/' },
  { label: '家庭档案', path: '/user/patient' },
  { label: '地址管理', path: '/user/address' },
  { label: '我的评价', path: '/' },
  { label: '官方客服', path: '/' },
  { label: '设置', path: '/' },
]3)遍历
html
<div class="user-page-group">
  <h3>快捷工具</h3>
  <van-cell v-for="(item, i) in tools" :key="item.label" :title="item.label" :to="item.path" is-link :border="false">
    <template #icon><cp-icon :name="`user-tool-0${i + 1}`" /></template>
  </van-cell>
</div>个人中心-退出登录
实现:退出功能
步骤:
- 准备按钮
- 实现退出
- 确认框
- 清除token
- 跳转登录
代码:
1)准备按钮
html
<a class="logout" href="javascript:;">退出登录</a>2)实现退出
ts
import { useUserStore } from '@/stores/index'

// ... 省略 ...

const store = useUserStore()
const router = useRouter()
const logout = async () => {
  await showConfirmDialog({
    title: '温馨提示',
    message: '您确认要退出优医问诊吗?',
  })
  store.delUser()
  router.push('/login')
}🏥 家庭档案 >
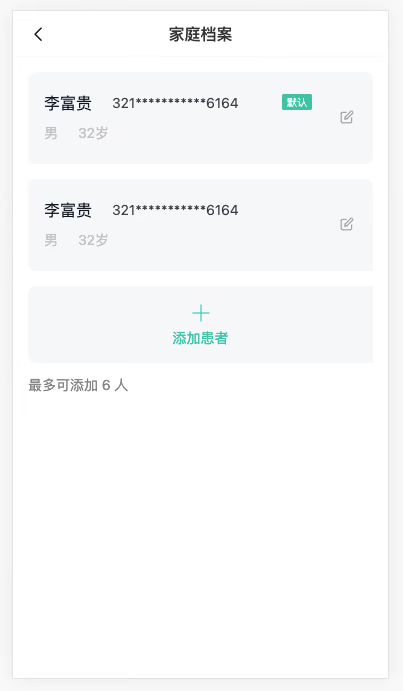
家庭档案-路由与组件
实现:路由的配置与组件基础布局
- 路由
router/index.ts
ts
    {
      path: '/user/patient',
      component: () => import('@/views/User/PatientPage.vue'),
      meta: { title: '家庭档案' }
}注意是一级路由
- 组件
vue
<script setup lang="ts"></script>

<template>
  <div class="patient-page">
    <cp-nav-bar title="家庭档案"></cp-nav-bar>
    <div class="patient-list">
      <div class="patient-item">
        <div class="info">
          <span class="name">李富贵</span>
          <span class="id">321111********6164</span>
          <span>男</span>
          <span>32岁</span>
        </div>
        <div class="icon"><cp-icon name="user-edit" /></div>
        <div class="tag">默认</div>
      </div>
      <div class="patient-item">
        <div class="info">
          <span class="name">李富贵</span>
          <span class="id">321333********6164</span>
          <span>男</span>
          <span>32岁</span>
        </div>
        <div class="icon"><cp-icon name="user-edit" /></div>
      </div>
      <div class="patient-add">
        <cp-icon name="user-add" />
        <p>添加患者</p>
      </div>
      <div class="patient-tip">最多可添加 6 人</div>
    </div>
  </div>
</template>

<style lang="scss" scoped>
.patient-page {
  padding: 46px 0 80px;
}
.patient-list {
  padding: 15px;
}
.patient-item {
  display: flex;
  align-items: center;
  padding: 15px;
  background-color: var(--cp-bg);
  border-radius: 8px;
  margin-bottom: 15px;
  position: relative;
  border: 1px solid var(--cp-bg);
  transition: all 0.3s;
  overflow: hidden;
  .info {
    display: flex;
    flex-wrap: wrap;
    flex: 1;
    span {
      color: var(--cp-tip);
      margin-right: 20px;
      line-height: 30px;
      &.name {
        font-size: 16px;
        color: var(--cp-text1);
        width: 80px;
        margin-right: 0;
      }
      &.id {
        color: var(--cp-text2);
        width: 180px;
      }
    }
  }
  .icon {
    color: var(--cp-tag);
    width: 20px;
    text-align: center;
  }
  .tag {
    position: absolute;
    right: 60px;
    top: 21px;
    width: 30px;
    height: 16px;
    font-size: 10px;
    color: #fff;
    background-color: var(--cp-primary);
    border-radius: 2px;
    display: flex;
    justify-content: center;
    align-items: center;
  }
  &.selected {
    border-color: var(--cp-primary);
    background-color: var(--cp-plain);
    .icon {
      color: var(--cp-primary);
    }
  }
}
.patient-add {
  background-color: var(--cp-bg);
  color: var(--cp-primary);
  text-align: center;
  padding: 15px 0;
  border-radius: 8px;
  .cp-icon {
    font-size: 24px;
  }
}
.patient-tip {
  color: var(--cp-tag);
  padding: 12px 0;
}
.pb4 {
  padding-bottom: 4px;
}
</style>定制化比较高的页面还是需要自己写,目前项目阶段大家知道结构即可。
家庭档案-展示患者
实现:患者的查询操作业务逻辑
步骤:
- 定义 api 函数,以及对应类型
- 实现查询患者业务
代码:
1)定义 api 函数,以及对应类型
- 定义类型
types/user.d.ts
ts
// 家庭档案-患者信息
export type Patient = {
  /** 患者ID */
  id: string
  /** 患者名称 */
  name: string
  /** 身份证号 */
  idCard: string
  /** 0不默认  1默认 */
  defaultFlag: 0 | 1
  /** 0 女  1 男 */
  gender: 0 | 1
  /** 性别文字 */
  genderValue: string
  /** 年龄 */
  age: number
}

// 家庭档案-患者信息列表
export type PatientList = Patient[]- 定义API
services/user.ts
ts
import type { CodeType, PatientList, User, UserInfo } from '@/types/user'
// ... 省略 ...
// 获患者信息列表
export const getPatientList = () => request<PatientList>('/patient/mylist')2)实现查询患者业务 User/PatientPage.vue
- 获取数据
ts
import { getPatientList } from '@/services/user'
import type { PatientList } from '@/types/user'
import { onMounted, ref } from 'vue'

// 1. 页面初始化加载数据
const list = ref<PatientList>([])
const loadList = async () => {
  const res = await getPatientList()
  list.value = res.data
}
onMounted(() => {
  loadList()
})- 进行渲染
html
<div class="patient-item" v-for="item in list" :key="item.id">
  <div class="info">
    <span class="name">{{ item.name }}</span>
    <span class="id">{{ item.idCard.replace(/^(.{6}).+(.{4})$/, '\$1********\$2') }}</span>
    <span>{{ item.genderValue }}</span>
    <span>{{ item.age }}岁</span>
  </div>
  <div class="icon"><cp-icon name="user-edit" /></div>
  <div class="tag" v-if="item.defaultFlag === 1">默认</div>
</div>
<div class="patient-add" v-if="list.length < 6"></div>身份证脱敏处理:/^(.{6}).+(.{4})$/
- 匹配第一个$1
^(.{6}) .+匹配中间字符- 匹配第二个$2
(.{4})$
家庭档案-v-model语法糖
掌握:vue3中v-model语法糖原理
回顾:
- vue2 中父子组件数据同步 父→子 子→父 如何实现?
v-model="count"或者xxx.sync="msg"
- v-model 语法糖 完整写法?
:value="count"和@input="count=$event"
- xxx.sync 语法糖 完整写法?
:xxx="msg"和@update:xxx="msg=$event"
现在:一个 v-model 指令搞定,不需要记忆两种语法
- vue3 中
v-model语法糖
html
<com-a v-model="count"></com-a>
<!-- 等价 -->
<com-a :modelValue="count" @update:modelValue="count=$event"></com-a>html
<com-a v-model:msg="str"></com-a>
<!-- 等价 -->
<com-a :msg="str" @update:msg="str=$event"></com-a>小结:
- vue3中只需要
v-model指令可以支持对个数据在父子组件同步,不再支持.sync语法。
提问:
- vue3 中 v-model 语法糖?
:modelValue="count"和@update:modelValue="count=$event"
- vue3 中 v-model:xxx 语法糖?
:xxx="count"和@update:xxx="count=$event"
cp-radio-btn 组件封装
实现:按钮组单选框组件
需求:
- 实现基础布局
- 实现组件的渲染
- 默认选中
- 切换选中
- 改用 v-model 写法
代码:
1)实现基础布局 components/CpRadioBtn.vue
vue
<script setup lang="ts"></script>

<template>
  <div class="cp-radio-btn">
    <a class="item" href="javascript:;">男</a>
    <a class="item" href="javascript:;">女</a>
  </div>
</template>

<style lang="scss" scoped>
.cp-radio-btn {
  display: flex;
  flex-wrap: wrap;
  .item {
    height: 32px;
    min-width: 60px;
    line-height: 30px;
    padding: 0 14px;
    text-align: center;
    border: 1px solid var(--cp-bg);
    background-color: var(--cp-bg);
    margin-right: 10px;
    box-sizing: border-box;
    color: var(--cp-text2);
    margin-bottom: 10px;
    border-radius: 4px;
    transition: all 0.3s;
    &.active {
      border-color: var(--cp-primary);
      background-color: var(--cp-plain);
    }
  }
}
</style>diff
import CpNavBar from '@/components/CpNavBar.vue'
import CpIcon from '@/components/CpIcon.vue'
+import CpRadioBtn from '@/components/CpRadioBtn.vue'

declare module 'vue' {
  interface GlobalComponents {
    CpNavBar: typeof CpNavBar
    CpIcon: typeof CpIcon
+    CpRadioBtn: typeof CpRadioBtn
  }
}2)实现组件的渲染
- 使用传入数组额方式动态展示需要显示的按钮
components/CpRadioBtn.vue
vue
<script setup lang="ts">
defineProps<{
  options: {
    label: string
    value: string | number
  }[]
}>()
</script>

<template>
  <div class="cp-radio-btn">
    <a class="item" href="javascript:;" v-for="item in options" :key="item.value">
      {{ item.label }}
    </a>
  </div>
</template>User/PatientPage.vue
ts
const options = [
  { label: '男', value: 1 },
  { label: '女', value: 0 },
]html
<cp-radio-btn :options="options"></cp-radio-btn>3)默认选中
使用组件:User/PatientPage.vue
ts
const gender = ref(1)html
<cp-radio-btn :options="options" :modelValue="gender"></cp-radio-btn>定义组件:components/CpRadioBtn.vue
vue
<script setup lang="ts">
defineProps<{
  options: {
    label: string
    value: string | number
  }[]
  modelValue?: string | number
}>()
</script>

<template>
  <div class="cp-radio-btn">
    <a
      class="item"
      href="javascript:;"
      v-for="item in options"
      :key="item.value"
      :class="{ active: modelValue === item.value }"
    >
      {{ item.label }}
    </a>
  </div>
</template>4)切换效果
使用组件:User/PatientPage.vue 暂时不管类型校验,这种写法不常用
html
<cp-radio-btn :options="options" :modelValue="gender" @update:model-value="gender = $event"></cp-radio-btn>定义组件:components/CpRadioBtn.vue
ts
const emit = defineEmits<{
  (e: 'update:modelValue', value: string | number): void
}>()
const toggleItem = (value: string | number) => {
  // 触发自定义事件把数据给父组件
  emit('update:modelValue', value)
}diff
    <a
      class="item"
      href="javascript:;"
      v-for="item in options"
      :key="item.value"
      :class="{ active: modelValue === item.value }"
+      @click="toggleItem(item.value)"
    >
      {{ item.label }}
</a>5)改用 v-model 写法
html
<cp-radio-btn :options="options" v-model="gender"></cp-radio-btn>提问:
options作用是?- 提供可选项
v-model语法糖,拆分写法?:modelValue="count"和@update:modelValue="count=$event"
家庭档案-侧滑层显示隐藏
实现:使用 van-popup 完成侧边栏效果
需求:
- 使用 van-popup 组件,实现显示隐藏
- 不使用 v-model 实现父子数据同步,理解语法糖
- 扩展 cp-nav-bar 组件,支持自定义返回
- 绘制表单
代码:
1)使用 van-popup 组件,实现显示隐藏 User/PatientPage.vue
ts
// 2. 打开侧滑栏
const show = ref(false)
const showPopup = () => {
  show.value = true
}html
<div class="patient-add" v-if="list.length < 6" @click="showPopup()"></div>html
<!-- 侧边栏 -->
<van-popup v-model:show="show" position="right">
  <cp-nav-bar title="添加患者" right-text="保存"></cp-nav-bar>
</van-popup>scss
.patient-page {
  padding: 46px 0 80px;
  :deep() {
    .van-popup {
      width: 80%;
      height: 100%;
    }
  }
}- 不使用 v-model 实现父子数据同步,理解语法糖
html
<van-popup :show="show" @update:show="show=$event" position="right">
  <cp-nav-bar title="添加患者" right-text="保存"></cp-nav-bar>
</van-popup>这种写法麻烦,知道写法即可,一般使用 v-model:show="show"
- 扩展 cp-nav-bar 组件,支持自定义返回
扩展 back 属性,如果有就执行 back 对应的函数。
diff
const router = useRouter()
const onClickLeft = () => {
+  if (props.back) {
+    return props.back()
+  }
  // 判断历史记录中是否有回退
  if (history.state?.back) {
    router.back()
  } else {
    router.push('/')
  }
}

// 2. 使用组件时候才能确定的功能:标题,右侧文字,点击右侧文字行为(props传入)
+const props = defineProps<{
  title?: string
  rightText?: string
+  back?: () => void
}>()User/PatientPage.vue 全屏展示,空出导航栏
html
<cp-nav-bar :back="() => (show = false)" title="添加患者" right-text="保存"></cp-nav-bar>scss
.patient-page {
  padding: 46px 0 80px;
  :deep() {
    .van-popup {
      width: 100%;
      height: 100%;
      padding-top: 46px;
      box-sizing: border-box;
    }
  }
}4)绘制表单
html
<van-form autocomplete="off" ref="form">
  <van-field label="真实姓名" placeholder="请输入真实姓名" />
  <van-field label="身份证号" placeholder="请输入身份证号" />
  <van-field label="性别" class="pb4">
    <!-- 单选按钮组件 -->
    <template #input>
      <cp-radio-btn :options="options"></cp-radio-btn>
    </template>
  </van-field>
  <van-field label="默认就诊人">
    <template #input>
      <van-checkbox :icon-size="18" round />
    </template>
  </van-field>
</van-form>小结:
- 属性可以传函数吗?
- 可以
- popup 组件怎么双向绑定?
- v-model:show
家庭档案-表单数据绑定
实现:患者信息录入的表单和绑定数据
需求:
- 绑定表单项数据
- 绑定复选框数据
- 打开侧滑栏重置表单
代码:User/PatientPage.vue
1)绑定数据 user.d.ts
ts
export type Patient = {
  id?: string
  name: string
  idCard: string
  defaultFlag: 0 | 1
  gender: 0 | 1
  genderValue?: string
  age?: number
}PatientPage.vue
ts
import type { Patient, PatientList } from '@/types/user'
import { computed, onMounted, ref } from 'vue'ts
const patient = ref<Patient>({
  name: '',
  idCard: '',
  gender: 1,
  defaultFlag: 0,
})2)绑定复选框数据
ts
// 默认值需要转换
const defaultFlag = computed({
  get() {
    return patient.value.defaultFlag === 1 ? true : false
  },
  set(value) {
    patient.value.defaultFlag = value ? 1 : 0
  },
})html
<van-field v-model="patient.name" label="真实姓名" placeholder="请输入真实姓名" />
<van-field v-model="patient.idCard" label="身份证号" placeholder="请输入身份证号" />
<van-field label="性别" class="pb4">
  <!-- 单选按钮组件 -->
  <template #input>
    <cp-radio-btn v-model="patient.gender" :options="options"></cp-radio-btn>
  </template>
</van-field>
<van-field label="默认就诊人">
  <template #input>
    <van-checkbox v-model="defaultFlag" :icon-size="18" round />
  </template>
</van-field>3)打开侧滑栏重置表单
ts
const initPatient: Patient = {
  name: '',
  idCard: '',
  gender: 1,
  defaultFlag: 0,
}
const patient = ref<Patient>({ ...initPatient })diff
// 2. 打开侧滑栏
const show = ref(false)
const showPopup = () => {
+  patient.value = { ...initPatient }
  show.value = true
}小结:
- 为什么使用计算属性 get set 写法?
- 组件需要的是 布尔 类型,需要通过计算属性转换一下
- 为什么要解构初始数据?
- 克隆一份新数据,要不然是同一个对象。
家庭档案-表单校验
实现:提交的时候校验表单,身份证需要校验格式
需求:
- 姓名,非空,2-18字符,身份证,非空,格式校验
- 保存的时候校验,整体校验
- 性别需要和身份证包含性别填写的一致,确认框提示
测试:
- 110101198307212600
- 110101196107145504
- 11010119890512132X
- 110101196501023433
- 110101197806108758
- 110101198702171378
- 110101198203195893
- 如有雷同纯属巧合,可删除。
代码:
1)姓名,非空,2-16字符 身份证,非空,格式校验
rules.ts
ts
const nameRules: FieldRule[] = [
  { required: true, message: '请输入姓名' },
  { pattern: /^(?:[\u4e00-\u9fa5·]{2,16})$/, message: '中文2-16个字符' },
]

const idCardRules: FieldRule[] = [
  { required: true, message: '请输入身份证号' },
  {
    pattern: /^[1-9]\d{5}(?:18|19|20)\d{2}(?:0[1-9]|10|11|12)(?:0[1-9]|[1-2]\d|30|31)\d{3}[\dXx]$/,
    message: '身份证号不正确',
  },
]

export { mobileRules, passwordRules, codeRules, nameRules, idCardRules }PatientPage.vue
html
<van-field v-model="patient.name" label="真实姓名" placeholder="请输入真实姓名" :rules="nameRules" />
<van-field v-model="patient.idCard" label="身份证号" placeholder="请输入身份证号" :rules="idCardRules" />2)保存的时候校验,整体校验 PatientPage.vue
ts
const form = ref<FormInstance>()
const onSubmit = async () => {
  await form.value?.validate()
  // 校验通过
}3)性别需要和身份证包含性别填写的一致,确认框提示 PatientPage.vue
ts
const onSubmit = async () => {
  await form.value?.validate()
  // 身份证倒数第二位,单数是男,双数是女
  const gender = +patient.value.idCard.slice(-2, -1) % 2
  if (gender !== patient.value.gender) {
    await showConfirmDialog({
      title: '温馨提示',
      message: '填写的性别和身份证号中的不一致\n您确认提交吗?',
    })
  }
  console.log('通过校验')
}提示:使用 any-rule 使用常用正则
家庭档案-添加患者
实现:患者的添加操作业务逻辑
步骤:
- 定义 api 函数,以及对应类型
- 实现添加患者业务
代码:
1)定义 api 函数
ts
import type { CodeType, Patient, PatientList, User, UserInfo } from '@/types/user'

// 添加患者信息
export const addPatient = (patient: Patient) => request('/patient/add', 'POST', patient)2)实现添加患者业务
diff
+import { addPatient, getPatientList } from '@/services/user'

// ... 省略 ...

const submit = async () => {
  await form.value?.validate()
  // 身份证倒数第二位,单数是男,双数是女
  const gender = +patient.value.idCard.slice(-2, -1) % 2
  if (gender !== patient.value.gender) {
    await showConfirmDialog({
      title: '温馨提示',
      message: '填写的性别和身份证号中的不一致\n您确认提交吗?'
    })
  }

+  // 添加
+  await addPatient(patient.value)
+  show.value = false
+  loadList()
+  showSuccessToast('添加成功')
}家庭档案-编辑患者
实现:患者的编辑操作业务逻辑
步骤:
- 打开对话框的时候,显示编辑患者信息界面
- 传入当前编辑的患者信息用于表单回显和界面展示
- 编写 api 函数
- 提交时候合并编辑请求
代码:
- 打开对话框,区分编辑和添加
html
<div class="patient-add" v-if="list.length < 6" @click="showPopup()"></div>html
<div @click="showPopup(item)" class="icon"><cp-icon name="user-edit" /></div>ts
const showPopup = (item?: Patient) => {
  if (item) {
    // 如果点的是编辑,解构出后台需要的数据
    const { id, gender, name, idCard, defaultFlag } = item
    patient.value = { id, gender, name, idCard, defaultFlag }
  } else {
    patient.value = { ...initPatient }
  }
  show.value = true
}diff
      <cp-nav-bar
        :back="() => (show = false)"
+        :title="patient.id ? '编辑患者' : '添加患者'"
        right-text="保存"
        @click-right="submit"
></cp-nav-bar>- api 函数
ts
// 编辑患者信息
export const editPatient = (patient: Patient) => request('/patient/update', 'PUT', patient)- 合并编辑患者请求
ts
import { addPatient, getPatientList, editPatient } from '@/services/user'ts
const submit = async () => {
  await form.value?.validate()
  // 身份证倒数第二位,单数是男,双数是女
  const gender = +patient.value.idCard.slice(-2, -1) % 2
  if (gender !== patient.value.gender) {
    await showConfirmDialog({
      title: '温馨提示',
      message: '填写的性别和身份证号中的不一致\n您确认提交吗?'
    })
  }

  // 添加 & 修改
  patient.value.id ? await editPatient(patient.value) : await addPatient(patient.value)
  show.value = false
  loadList()
  showSuccessToast(patient.value.id ? '编辑成功' : '添加成功')
}家庭档案-删除患者
实现:患者的删除操作业务逻辑
步骤:
- 准备按钮
- 定义API函数
- 点击删除,弹出确认框,确认删除
代码:
- 准备按钮
diff
      </van-form>
+      <van-action-bar>
+        <van-action-bar-button>删除</van-action-bar-button>
+      </van-action-bar>
</van-popup>scss
// 底部操作栏
.van-action-bar {
  padding: 0 10px;
  margin-bottom: 10px;
  .van-button {
    color: var(--cp-price);
    background-color: var(--cp-bg);
  }
}- 定义API
ts
// 删除患者信息
export const delPatient = (id: string) => request(`/patient/del/${id}`, 'DELETE')- 点击删除,弹出确认框,确认删除
html
<van-action-bar v-if="patient.id">
  <van-action-bar-button @click="remove">删除</van-action-bar-button>
</van-action-bar>ts
import { addPatient, getPatientList, editPatient, delPatient } from '@/services/user'
// ... 省略 ...
const remove = async () => {
  if (patient.value.id) {
    await showConfirmDialog({
      title: '温馨提示',
      message: `您确认要删除 ${patient.value.name} 患者信息吗 ?`,
    })
    await delPatient(patient.value.id)
    show.value = false
    loadList()
    showSuccessToast('删除成功')
  }
}
📌 评论规则
需要 GitHub 账号登录 禁止发布广告、无关内容 请保持友善讨论